Tuesday, May 24, 2011

Black Bottom Cupcakes

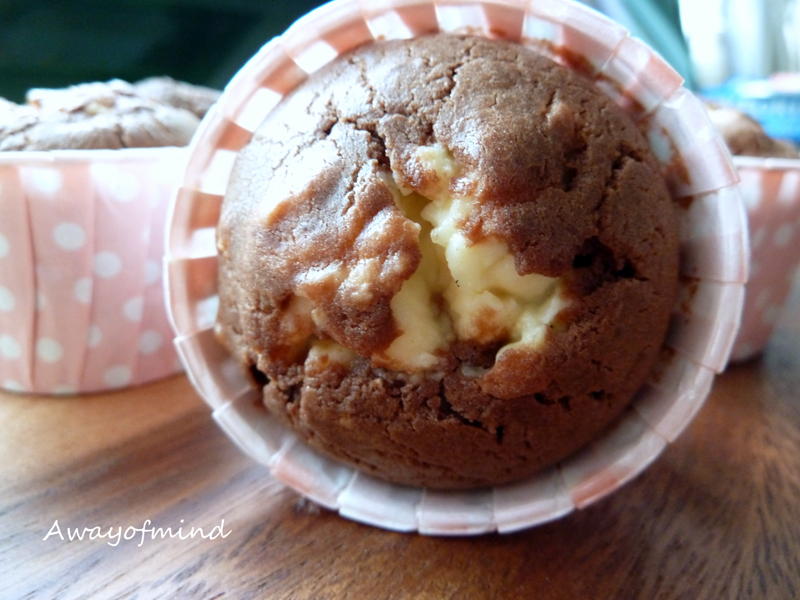
Venturing into the world of black bottom cupcakes. Never had one myself before, so tried out one recipe since I have leftover cream cheese. Was comparing this one and Magnolia's, decided to go for this as it makes a smaller batch. Urm. Not too satisfied with it. I wonder if black bottom cupcakes are supposed to have this texture?

Though packed with deep chocolate flavor, the chocolate sponge cake is pretty dense, I guess it's supposed be like that to keep the cream cheese portion in check. Will do a comparison once I try Magnolia's one.

Am submitting this entry to Aspiring Bakers #7 - Chocolate Delight (May 2011).

Black Bottom Cupcakes (adapted from The Hummingbird Bakery Cookbook)

Ingredients:

For the chocolate sponge base:
190g plain flour
120g caster sugar
40g cocoa powder, plus extra to decorate
1/2 tsp bicarbonate of soda
40 ml sunflower oil
1/2 tsp vanilla extract
125ml water

For the cheesecake filling:
140g cream cheese
1/2 tsp vanilla extract
A pinch of salt
100g chocolate chips (I use 60g)

Method:
1. Preheat the oven to 170°C.
2. For the chocolate sponge base put the flour, sugar, cocoa powder and bicarbonate of soda in a large bowl and mix with a handheld electric whisk on slow speed until all the dry ingredients are well incorporated.
3. Put the oil, vinegar, vanilla extract and water in a jug and whisk to combine. While the electric whisk is running in the flour bowl, slowly add the contents of the jug, increasing the speed of the blender as the mixture thickens. Continue to beat until all the ingredients are incorporated (scrape any unmixed ingredients from the side of the bowl with a rubber spatula).
4. Line a 12 hole cupcake tray with paper cases. Spoon the mixture into the paper cases until two-thirds full and set aside.
5. For the cheesecake filling beat together the cream cheese, sugar, egg, vanilla extract and salt in a freestanding electric mixer with a paddle attachment (or use a handheld electric whisk) on medium-slow speed until smooth and fluffy.
6. Stir in the chocolate chips by hand until evenly dispersed. Don’t overmix, otherwise the cream cheese will start to split.
7. Scoop about 1 tbsp of the cheesecake filling on top of the cupcake mixture and bake in the preheated oven for about 20 minutes, or until the cupcakes are firm to the touch and they have an even golden colour on the cheesecake filling. Don’t overcook as the cheesecake will become very dry and crumbly.
8. Leave the cupcakes to cool slightly in the tray before turning out onto a wire cooling rack to cool completely.
9. For the cream cheese frosting beat the icing sugar and butter together in a freestanding electric mixer with a paddle attachment (or use a handheld electric whisk) on medium-slow speed until the mixture comes together and is well mixed. Add the cream cheese in one go and beat until it is completely incorporated. Turn the mixer up to medium-high speed. Continue beating until the frosting is light and fluffy, at least 5 minutes. Do not overbeat, as it can quickly become runny.
10. When the cupcakes are cold, spoon the cream cheese frosting on top, if using, and decorate with a light sprinkling of cocoa powder.

Friday, May 20, 2011

Vanilla Bean Chiffon Cake

Officially declaring that I'm going on a diet. Gaining weight isn't such a good idea when you want to gain some of that lost confidence in life back.

Hello running! Byebye tummy!

On a side note, I'm honestly very touched by all the care and concern that my family and friends have shown for me during this period. Thinking about the little things they do makes me want to cry more than when I think about what I've lost. HA.

A relatively healthy bake to celebrate the self-declared-and-possibly-unsuccessful weight loss journey...Chiffon! Soft like pillows, and they literally melt in your mouth! A hot favorite among my mama and her auntie friends heehee.

Vanilla Bean Chiffon Cake (modified from Keiko Ishida's Okashi)
makes 4 10cm chiffon

Ingredients:
2 egg yolks
8g caster sugar
1/2 vanilla bean, split length wise and scraped for seeds (I use 1)
24g water
24g canola oil
32g cake flour

2 egg whites (weighed mine to be 81g)
36g caster sugar
4g corn flour

Method:
1. Preheat oven to 160°C. Sift flour twice
2. Place egg yolks and sugar in a bowl and beat well. Add water, canola oil, vanilla seeds and stir to incorporate. Add flour and mix well until the batter becomes sticky.
3. To make meringue, combine sugar and corn flour. Beat egg whites until foamy. Add half the sugar and continue beating for a few minutes, then add remaining sugar and beat until egg whites are glossy and stiff peaks form.
4. Add one-third of meringue into egg yolk mixture and fold in lightly, then add remaining meringue and fold to incorporate completely.
5. Pour batter into an ungreased chiffon cake tube pan. Bake for 20 mins.
6. When cake is done, remove from oven and turn it over, leaving it to cool.
7. Once cake has cooled completely, carefully run a knife or spatula around the sides of the cake to loosen it before inverting onto a wire rack.

Tuesday, May 17, 2011

Rich Chocolate Cheesecake

A tribute to Mr Chiam See Tong. Pictures and captions credits to AsiaOne.

Independent candidate for Cairnhill, Mr Chiam See Tong (2R) in the 1976 general elections. It was a strictly one-man show when lawyer Chiam See Tong went campaigning at Newton Court. All he had was his Volkswagen atop which a loud speaker was attached.

Independent candidate for Cairnhill, Mr Chiam See Tong in the 1976 general elections. It was a strictly one-man show when lawyer Chiam See Tong went campaining at Newton Court. All he had was his Volkswagen atop which a loud speaker was attached. The highlight of his first election rally was a lively question-and-answer session with a crowd of about a 100 people. He was also responsible for one of Singapore's famous political icons: Herbie - his maroon-coloured Volkswagen Beetle which has been a staple at every election he has contested since 1976.

Mr Chiam See Tong (garland), an Independent Party candidate contesting in Potong Pasir, surrounded by his supporters at the counting centre in Victoria School in 1979.

Polling Day 1984 - A victorious Mr Chiam See Tong after he was declared winner in Potong Pasir in 1984.

General election 1991: Singapore Democratic Party (SDP) election rally at Yishun. SDP secretary-general Chiam See Tong (garlanded) and his party members get overwhelming support from their supporters.

Mr Chiam fulfilled his residents' wish for an MRT at Potong Pasir.

Veteran opposition MP, Mr Chiam See Tong, posing at a new amphitheatre and pavilion area. His town council has just completed in July 2000, in Potong Pasir. Mr Chiam has been MP there since 1984.

Mr Chiam with residents. The drawing represented the Potong Pasir MRT line that was built.

Mr Chiam during a Meet The People session.

Potong Pasir MP Chiam See Tong in his maroon Volkswagen Beetle which he had been using as his election campaign vehicle. He recently described it to The Sunday Times thus: 'It is my warhorse and I never go to battle without it.'

Chiam See Tong speaking at the party's rally at Tampines Stadium. At the General Election 2006, he was the chairman of the Singapore Democratic Alliance.

Chiam See Tong carrying a little girl who was chanting together with the crowd, "Potong Pasir, Chiam See Tong!" during the 2006 General Election.

Two weeks after he suffered a stroke in 2008, he was back at his makeshift void deck cubicle in Potong Pasir for his weekly Meet-the-People Sessions.

Mr Chiam See Tong (centre) assisted to his seat by Hougang MP Low Thia Khiang (second from right) and Dr Mohamad Maliki Osman after his arrival at the Padang for the National Day Parade (NDP) 2010.

Mr Chiam See Tong petting a jack russell terrier Xiao Lian, who belongs to a Potong Pasir resident known only as Alan, after a meeting with reporters at a Meet-the-People session.

*****
I'm honored to say that I've finally got to meet up with Mr Chiam face to face in the weekend. It was awesome. Feel very, very fortunate to be able to do so. Not going to flaunt my photos here. I ran from my place in Kim Keat Link estate to Bishan Park for the meetup, so you can imagine what kind of messed up state I was in by the time I get to see Mr Chiam hehe

So...I'm having a chocolate streak lately. Baked this awfully chocolatey cheesecake. It's uber dense and rich as its name promised. Carries a good load of chocolate which will intrigue dark chocolate loving fans. I might have overbaked it a little because 180°C sounds tad high for a water bath cheesecake bake. It's not as wet as I like my cheesecakes to be, so the search for the perfect cheesecake continues.

Am submitting this entry to Aspiring Bakers #7 - Chocolate Delight (May 2011).

Rich Chocolate Cheesecake (adapted from Tish Boyle's The Cake Book)

Ingredients:


Chocolate Crumb Crust:
180g Nabisco's Famous Chocolate Wafer crumbs (These are practically not available over here. I make my own, recipe from here)
57g unsalted butter, melted

Chocolate Filling:
340g bittersweet chocolate, coarsely chopped (I use 200g 45% and 140g 70%)
680 g cream cheese, softened
200 g granulated sugar, divided
3 tbsp natural (not Dutch-processed) cocoa powder
4 large eggs, at room temperature
180 ml heavy cream (cool but not cold)
2 tsp vanilla extract
2 tbsp Kahlua or Cognac (I use Baileys)

Method:

Make the crust:
1. Position a rack in the center of the oven and preheat the oven to 180°C. Grease the bottom and sides of a 9x3-inch springform pan. Cut an 18 inch square of heavy-duty aluminum foil and wrap the foil around the outside of the pan.
2. In a medium bowl, combine the Oreo crumbs and melted butter. Pat the mixture into the bottom of the prepared pan. Bake the crust for 8 minutes, until set.
3. Set the pan on a wire rack and cool the crust completely. Leave the oven on.

Make the filling:
4. Melt the chocolate in the top of a double boiler over barely simmering water, stirring occasionally. Remove the pan from the heat, leaving the chocolate over the hot water.
5. In the bowl of an electric mixer, using the paddle attachment, beat the cream cheese at medium-low speed until creamy and lump-free, about 2 minutes, scraping down the sides of the bowl as necessary. Gradually add 1/4 cup of the sugar and beat until blended. Add the cocoa powder and mix until blended. Remove the bowl from the mixer stand.
6. In a clean mixer bowl, using the whisk attachment, beat the eggs at medium speed until blended, about 1 minute. Gradually add the remaining 3/4 cup sugar and beat at high speed until tripled in volume, about 2 minutes. Remove the bowl and whisk from the mixer stand and replace them with the bowl containing the cream cheese mixture and the paddle attachment. Mixing at low speed, gradually add the egg mixture to the cream cheese mixture, scraping down the sides of the bowl as necessary to ensure that the mixture is even-textured. Mix in the melted chocolate. Add the heavy cream, vanilla extract, and Kahlua (or Cognac) and mix until blended. Remove the bowl from the mixer stand and stir the filling several times to ensure that it is evenly blended.
7. Scrap the filling over the baked crust in the pan. Place the pan in a roasting pan or large baking pan. Place the roasting pan in the oven and pour enough hot water into the pan to come 1 inch up the sides of the springform pan. Bake the cheesecake in the water bath for 65 to 75 minutes, until the center of the cake is set but slightly wobbly (the cake will set completely as it cools).
8. Remove the cake pan from the water bath. Place the pan on a wire rack and carefully loosen the foil. Immediately run the tip of a paring knife around the sides of the pan, to prevent the top from cracking. Let the cake cool completely.
9. Refrigerate the cheesecake for at least 4 hours before serving.
10. To serve, slice the cake with a thin-bladed sharp knife, wiping the knife clean between each cut.

Thursday, May 12, 2011

The Chewy

*Arggghh. Blogspot screwed up. Reposting this*

What happens when you have to get rid of your expiring bread flour and your dough hooker is down.

You make cookies!

Am a big fan of Alton Brown. Yes, I like geeks. A cooking/baking geek is even more appealing. If you have not watched his shows before, he basically explains how science works in cooking/baking. That's enough to get me swooning.

And err, if you're going to google on how he looks...don't expect a good looking dude like Chuck Hughes.

Gooey in the middle, crispy on the edges. Could be more more chewy, but not complaining. Cookie's a little too tall for my liking, was aiming for the flat slappy kind like Subway. No overnight chilling or any of that 24-36 hour chilling-in-fridge marathon which I like.

The Chewy turned out more popular than I think they were. One intern at Mom's workplace asked if they're Subway cookies. Mom said, nope, it's my daughter's No-Way cookies.

Am submitting this entry to Aspiring Bakers #7 - Chocolate Delight (May 2011).

The Chewy (adapted from Alton Brown's Good Eats)
Makes 17 cookies using my #40 disher & halving the recipe. Recipe shown below is the original recipe. Makes 30.

Ingredients:
227g unsalted butter
360g bread flour
1 tsp kosher salt
1 tsp baking soda
50g sugar
270g brown sugar
1 egg
1 egg yolk
2 tbsp milk
1 1/2 tsp vanilla extract
340g semisweet chocolate chips

Method:
1. Heat oven to 190°C.
2. Melt the butter in a heavy-bottom medium saucepan over low heat. Sift together the flour, salt, and baking soda and set aside.
3. Pour the melted butter in the mixer's work bowl. Add the sugar and brown sugar. Cream the butter and sugars on medium speed.
4. Add the egg, yolk, 2 tablespoons milk and vanilla extract and mix until well combined. Slowly incorporate the flour mixture until thoroughly combined.
5. Stir in the chocolate chips.
6. Chill the dough, then scoop (#20 disher) onto parchment-lined baking sheets, 6 cookies per sheet. Bake for 14 minutes or until golden brown, checking the cookies after 5 minutes. Rotate the baking sheet for even browning. Cool completely and store in an airtight container.

Monday, May 9, 2011

Chocolate Fudge Cake with Light Whipped Ganache

A bitter aftertaste after knowing the results of General Elections 2011.

1. Tin Pei Ling, who cannot distinguished a chicken's head from a pig's head has been elected into the parliament.
2. Wong Kan Seng got away with letting a limping terrorist escape while a fine minister like George Yeo was voted out.
3. The death of the Potong Pasir legacy.

But I know this opens a brand new chapter...and I look forward to the future. Mr Chiam, we will uphold your spirit as the Father of Democracy. You will, always be my Chiampion! :)

Awaiting for the GE2011 results!
So we have PAP, WP, SPP, NSP supporters! Rojak fan club hahah

My facebook wall is now roaring with resentment for Tin Pei Ling's entry into the parliament. Ahh well.

And I also want to say that I'm very proud of my parents, they did the right thing and voted wisely despite they were initially afraid. My sister and I have been actively participating in rally hopping and we have a lot of dialogues on how we feel about national issues. From this general elections, I felt my family getting even more closely knitted.

I also discussed this election fever with ZY during our baking session hahah! After that day, I felt a little more confident to do layered cakes, seeing how he assembled everything together. Butbutbut I screwed up mine. It was basically falling apart with the ganache sweating in the hot weather. I managed to save it and it didn't look too bad afterall. Definitely need more practice.

The chocolate cake has an insanely fine texture yet has the right amount of chocolate, accompanied by whipped ganache that is so light that it literally disappears into your mouth like cloud. I'm really looking forward to my next bake from this book.

Am submitting this entry to Aspiring Bakers #7 - Chocolate Delight (May 2011).

Chocolate Fudge Cake (adapted from Rose Levy Beranbaum's Cake Bible)

Ingredients:
85 unsweetened cocoa (Dutch-processed)
354g boiling water
3 large eggs
1 1/2 tsp vanilla
300g sifted cake flour
434g light brown sugar
2 1/4 tsp baking powder
3/4 tsp baking soda
3/4 tsp salt
227g unsalted butter

Method:
1. Grease two 9 x 1.5" cake pans, line the bottoms with parchment or wax paper, and then regrease and flour. (If you only have 2"-high pans, either do 2/3 the recipe for 1 layer or 1 1/3 the recipe for 2 layers.)
2. Preheat the oven to 175°C.
3. In a medium bowl, whisk together the cocoa and boiling water until smooth. Cool to room temperature.
4. In another bowl, lightly combine the eggs, 1/4 of the cocoa mixture, and vanilla.
5. In a large mixing bowl, combine the remaining dry ingredients and mix on low speed for 30 seconds. Add the butter and remaining cocoa mixture. Mix on low speed until the dry ingredients are moistened. Increase to medium speed (high speed if using a hand mixer) and beat for 1 1/2 minutes to aerate and develop the cake's structure. Gradually add the egg mixture in three batches, beating for 20 seconds after each addition to incorporate the ingredients and strengthen the structure. Scrape down the sides.
6. Scrape the batter into the prepared pans and smooth the surface with a spatula. The pans will be about 1/2 full. Bake 20-30 minutes or until a tester inserted near the center comes out clean and the cake springs back when pressed lightly in the center. The cakes should start to shrink from the sides of the pans only after removal from the oven.
7. Let the cakes cool in the pans on racks for 10 minutes. Loosen the sides with a small metal spatula and invert onto greased wire racks. To prevent splitting, reinvert so that tops are up and cool completely before wrapping airtight.

Light Whipped Ganache Filling and Frosting (adapted from Rose Levy Beranbaum's Cake Bible)

Ingredients:
227g bittersweet chocolate (I use 138g 55% & 89g 70% Valrhona chocolate)
464g heavy cream
1/2 tsp vanilla

Method:
1. Break the chocolate into pieces and process in a food processor until very fine.Heat cream to the boiling point and with the motor running, pour it through the feed tube in a steady stream. Process a few seconds until smooth.
2. Transfer to a large bowl of electric mixer refrigerate until cold, stirring once or twice. Do not allow the mixture to get too cold or it will be too stiff to incorporate air.
3. Add the vanilla and beat the mixture just until very soft peaks form when the beater is raised. It will continue to thicken after a few minutes at room temperature. If the mixture gets overbeaten and grainy, it can be restored by remelting, chilling, and rebeating.

Thursday, May 5, 2011

Banana and Cinnamon Muffins

Using a handheld mixer for muffins seem kinda unbelievable to me. & trust me, you shouldn't. The overmixing yield a rubbery texture, and tell me how do I not overmix when the electric hand mixer was roaring in circles whenever the switch is on. I'm not sure if 75g reduction of banana compromise the taste, but it wasn't really banana-ish. No stamp of approval for this recipe.

Friend says: george yeo asked for young people to write to him
Friend says: i did
Friend says: lol
Jean says: LOL
Jean says: what did u say
Friend says: i wrote like 1 page long
Friend says: I care more about formulating of national policies, for Singaporeans. And for the sake of a free future, the Opposition must win.
Friend says: thats how i ended it
Jean says: LOL
Jean says: ok good luck
Jean says: u will be fixed
Jean says: LOL
Friend says: =[
Jean says: ok kidding
Friend says: If i go missing
Friend says: let the people know
Jean says: LOL
Jean says: ok hero
Friend says: i send the letter to ur facebook
Jean says: -.-
Friend says: i let george yeo know u also read it before
Jean says: WTF
Friend says: okay u better tell someone to tell someone if you're gone missing
Jean says: ...

On a serious note, 7 May is approaching. Do give good thought about your votes, and which party aligns most with your values. Is getting a splash of new paint over your own walls more important or the nation wide issues as whole.

"The test of our progress as a nation is not whether we add more to those who already have much, but whether we provide enough to those who have less."

- Chen Show Mao, Workers' Party

Banana and Cinnamon Muffins (adapted from The Hummingbird Bakery Cookbook)

Ingredients:
350g all purpose flour
3/4 tsp salt
1 1/2 baking powder
1/2 tsp bicarbonate of soda
2 tsp ground cinnamon plus extra to sprinkle
160g caster sugar plus extra to sprinkle
375ml buttermilk
1 egg
1/2 tsp pure vanilla extract
70g unsalted butter, melted
400g mashed banana (325g for me, because I ran out of bananas)

Method:
1. Preheat the oven to 170°C.
2. Put the flour, sugar, salt, baking powder, bicarbonate of soda & cinnamon into a large bowl and beat with a handheld electric whisk until combed.
3. Put the buttermilk, egg & vanilla extract in a bowl and mix to combine. Slowly pour into the flour mixture and beat on slow speed until all the ingredients are incorporated.
4. Pour in the melted butter and beat until incorporated. Stir in the bananas with a wooden spoon until evenly dispersed.
5. Spoon the mixture into the paper cases until two-thirds full and sprinkle a little extra sugar and cinnamon over the tops. Bake in the preheated oven for 20-30 mins, or until golden brown and the muffin bounces back when touched. A skewer inserted in the centre should come out clean. Leave the muffins to cool slightly in the pan before turning out onto a wire rack to cool completely.

Tuesday, May 3, 2011

Devil's Food Cupcakes

"There’s a scarecrow, and he wanted a new brain. When we vote, we should use our heads. We should think about what is good for us, what is good for our children.

Second, there’s a Tin Woodsman who wanted a heart. So when you vote, also think about the Singaporeans who are worse off than you, having a harder time to make a good living in Singapore.

Third, there’s a cowardly lion who wanted some courage. So after you know what’s right to do, have the courage to do what’s right even if it means some changes from what you’re used to. Singapore, don’t be a cowardly lion!”

- Chen Show Mao, Workers' Party

Workers' Party Rally @ Serangoon Stadium 29 April 2011

"Mr Lee Kuan Yew once asked who is this man Chiam See Tong, he is like a shooting star. Shooting across the sky. And he took the trouble to examine my 'O' level results. And he went through the results very carefully and counted very carefully also. 1...2...3...4...5. He said and looked again, only 5. But I'm not ashamed of my 'O' level results. How many of you got 5 'O' levels? Put up your hands please. So you and I are the same. But don't be afraid, that's not the end of the world for you. I have 5 'O' levels, but I am a lawyer now."

"I am actually not a brave man, but I love Singapore, and I love Singaporeans..."

- Mr Chiam See Tong, Singapore's People Party

Singapore's People Party's Rally @ Bishan Stadium 2 May 2011

To all fellow Singaporeans...

These cupcakes have something to say to you.

.
.
.


Devil's Food Cupcakes (adapted from Allysa Torey & Jennifer Appel's The Complete Magnolia Bakery Cookbook)
the recipe below shows 2/3 of the original recipe, makes 25 small cupcakes for me

Ingredients:
173g cake flour
61g unsweetened Dutch process cocoa
1 tsp baking soda
1/3 tsp salt
113g unsalted butter, softened
218g light brown sugar (I use 184g as I ran out of it)
66g sugar
2 large eggs, room temperature
240ml buttermilk
1 1/3 tsp vanilla extract

Method:
1. Preheat the oven to 180°C.
2. Line muffin tin with cupcake papers.
3. In a small bowl, sift together the flour, cocoa, baking soda and salt. Set aside.
4. In a large bowl, on medium speed of an electric mixer, cream the butter until smooth. Add the sugar gradually and beat until fluffy, abt 3 mins.
5. Add the eggs one at a time, beating well after each addition.
6. Add the dry ingredients in 3 parts, alternating with the buttermilk and vanilla. With each addition, beat until the ingredients are incorporated but do not overbeat. Using a rubber spatula, scrape down the batter in the bowl to make sure the ingredients are well blended.
7. Carefully spoon the batter into the cupcake liners, filling them abt three-quarters full. Bake for 20-25mins, or until a cake tester inserted into the center of the cupcake comes out clean.
8. Cool the cupcakes in the tins for 25 to 30 mins (17 mins for me). Remove from the tins and cool completely on a wire rack before icing.
9. Decorate as desired.

Am submitting this entry to Aspiring Bakers #7 - Chocolate Delight (May 2011).

Sunday, May 1, 2011

Aspiring Bakers #6: Say Cheese! (April 2011) - Round Up

Thanks all for your participation and support. The beautiful pictures of the cheesy bakes which greeted my mailbox were all so irresistible! I hope everyone had fun participating in April's theme...Say Cheese! Hope it brought smiles to everyone who had the luxury to enjoy your bakes a smile as well :) We received a total of 105 entries for the April Aspiring Bakers.

Here are your entries:


I Can't Believe it's Prata (Leek, Sausage & Cheese Hat) by Wai Fong of Fong's Kitchen Journal


Mini cream cheese pumpkin tart by experimental cook of cookwithnobooks.blogspot.com


Brazilian Cheese Bread (Pão de Queijo) by Agnes


Cream Cheese Chocolate Chip Cookie by Sherlyn Lui of Sherlyn's hobbies blog


Oreo Cheesecake by Olivia Stephens of Food Love Passion


Oreo cheese pops by Yvonne Lee of Muimui25


Steamed Cheesy Brownies With Chocolate Chips by Alice of I Love. I Cook. I Bake


Thank you for your support and participation once again. For May's theme, we have Doris of Tested & Tasted hosting the Aspiring Bakers #7 - Chocolate Delight. So head down to her blog for the details and we shall see you there :)

P.S. If you have submitted an entry and it's not being reflected here, please drop me an email at needmorenoms@gmail.com