Pages

Thursday, June 30, 2011

Cream Scones

Ahh....a little sad that I didn't manage to squeeze out the time to look through bread recipes to support dearest Sweetylicious' Aspiring Bakers this month. Baked scones instead for breakfast.

They look awfully beautiful, like works of pastry shops eh?

The downside is though...My bad. I used bleached all purpose flour instead. I think the lower protein content caused the insides to be softer and more crumbly. Plus I underbaked them a little, so it resulted in scones that are made for old people without teeth.

Cream Scones (adapted from Sur La Table's The Art & Soul of Baking)

Ingredients:
280g unbleached all-purpose flour
50g sugar
2 1/2 tsps baking powder
1/4 tsp salt
113g cold unsalted butter, cut into 1/2 inches cubes
(Toss in 70g raisins before adding cream)
240ml chilled heavy whipping cream
1 egg, lightly beaten
1 tbsp sugar, or for more crunch and a touch of brown sugar flavor, 2 tablespoons turbinado or raw sugar

Method:
1. Preheat the oven to 220°C and position an oven rack in the center. Line the baking sheet with parchment paper or a thin silicone mat. Place the flour, sugar, baking powder, and salt in the bowl of the food processor and process for 10 seconds to blend well. Add the cold butter pieces and pulse 5 times at 1-second intervals, or until the butter is cut into medium pieces. Add the cream and pulse another 20 times, or until the dough holds together in small, thick clumps. Use a spatula to scrape the dough out onto a lightly floured work surface. Gently squeeze the clumps together until they form a cohesive dough.
2. Pat the dough into a circle 7 inches in diameter and about 1 inch thick. Use a chef's knife to cut the dough into 8 equal wedges and transfer to the prepared baking sheet, spacing them about 2 inches apart.
3. Brush the tops with a thin coating of the lightly beaten egg (you will not use all the egg). Sprinkle evenly with the sugar. Bake the scones for 14 to 16 minutes, until firm to the touch and golden brown. Transfer to a rack and let cool for 5 minutes. Serve the scones warm or at room temperature.

Storing: Once baked, serve the scones within 2 hours, when they are at their freshest and most appealing. Keep them uncovered at room temperature until serving time.

Thursday, June 23, 2011

Blueberry Muffins

Am going back to school this coming July! Will be juggling with work and part time studies, looks like I'll have even less time for baking than I already have currently. Promised myself to do a proper layered cake before my programme starts...I better!!

Had a tight week, didn't had time to whip up something extravagant, so just bought a box of blueberries randomly, hoping that I'll find something for my baking fix. This recipe is surprisingly rewarding. The ingredients list look humbly normal, no fanciful walnuts or streusel toppings but it tastes really good. The texture is cake-like tender despite being a muffin. The blueberries I bought were kinda sour but I'm cool about it, complements the sweet cake really well.

Blueberry Muffins (adapted from Martha Stewart's Martha Stewart's Baking Handbook)
(makes 12 standard size muffins)

Ingredients:
You will need:
113g unsalted butter, room temperature plus more for the pan
280g all-purpose flour
1 1/2 tsps of baking powder
1/2 tsp of salt
2 cups of blueberries, fresh or thawed if frozen (270g for me)
200g sugar
2 eggs
2 tsps pure vanilla extract
120ml milk

Method:
1. Preheat oven to 190°C. Generously butter a standard 12-cup muffin pan and dust with flour, tapping out excess; set aside. In a medium bowl, whisk together the flour, baking powder, and salt. Working over the bowl, toss with blueberries in a fine sieve with about 1 1/2 tsps of the flour mixture to lightly coat; set aside the flour mixture and blueberries.
2. In the bowl of an electric mixer fitted with the paddle attachment, beat the butter and sugar on medium-high speed until light and fluffy, about 3 mins. Add the eggs, one at a time, beating until combined. Mix in the vanilla.
3. With the mixer on low speed, add the reserved flour mixture, beating until just combined. Add milk, beating until just combined; do not overmix. Using a rubber spatula, fold in the blueberries. Divide the batter evenly among the prepared muffin cups.
4. Bake, rotating the pan halfway through, until the muffins are golden brown and a cake tester inserted in the center of one muffin comes out clean, about 30 mins. Transfer the pan to a wire rack to cool 10 mins. Turn the muffins on their sides in their cups, and let cool. Serve warm or at room temperature.

Saturday, June 18, 2011

Red Velvet Cupcakes II

They don't look shocking red anymore because my red food coloring ran out and tahdahh, a reddish brown "velvet cupcake". They're softer than the previous recipe, but tastes pretty flat to me somehow. I guess the difference in taste comes from using vegetable oil instead of butter.

Hmm. Think I'm favoring HummingBird's recipe more.

Red Velvet Cupcakes (adapted from Martha Stewart's Cupcakes)
(makes 24 cupcakes)

Ingredients:
324g cake flour (not self- rising), sifted
2 tbsps unsweetened Dutch-process cocoa powder
1 tsp salt
300g sugar
360ml vegetable oil
2 large eggs, room temperature
1/2 tsp red gel-paste food color (I use 2 tsp red food coloring)
1 tsp pure vanilla extract
240ml buttermilk
1 1/2 tsp baking soda
2 tsp distilled white vinegar

Method:
1. Preheat oven to 175°C. Line standard muffin tins with paper liners. Whisk together cake flour, cocoa, and salt.
2. With an electric mixer on medium-high speed, whisk together sugar and oil until combined. Add eggs, one at a time, beating until each is incorporated, scraping down sides of bowl as needed. Mix in food color and vanilla.
3. Reduce speed to low. Add flour mixture in three batches, alternating with two additions of buttermilk, and whisking well after each. Stir together the baking soda and vinegar in a small bowl (it will foam); add mixture to the batter, and mix on medium speed 10 seconds.
4. Divide batter evenly among lined cups, filling each three-quarters full. Bake, rotating tins halfway through, until a cake tester inserted in centers comes out clean, about 20 mins. Transfer tins to wire racks to cool completely before removing cupcakes. Cupcakes can be stored overnight at room temperature, or frozen up to 2 months, in airtight containers.
5. To finish, use a small offset spatula to spread cupcakes with frosting.

Tuesday, June 14, 2011

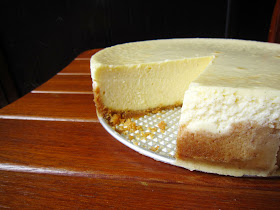
Tall and Creamy Cheesecake

When I first put a bite of this cheesecake into my mouth, I was totally won over. Remember how I was raving about the awesome cheesecake from Cheesecake Factory I had when I was in States, this one has 80% resemblance to it!

The texture is light and fluffy...surprising huh? I guess it has got to do with beating the cream cheese excessively according to the recipe's instructions. I'm not really a New York Cheesecake fan, so...WOW. I'm so happy that I've made this hahahah!

P.S. 3 of my friends asked me if the specks are black pepper? EPIC FAIL.

Tall and Creamy Cheesecake (adapted from Dorie Greenspan's Baking: From My Home to Yours)

Ingredients:

For the crust:
175g graham cracker crumbs (I use digestive biscuits)
3 tbsps sugar (I use 1 tbsp)
Pinch of salt
56.5g unsalted butter, melted

For the cheesecake:
900g cream cheese, at room temperature
266g sugar
1/2 tsp salt
2 tsps pure vanilla extract
(I also top it off with 2 vanilla pods)
4 large eggs, at room temperature
320ml sour cream or heavy cream, or a combination of the two (I use heavy cream)

Method:
To make the crust:
1. Butter a 9-inch springform pan—choose one that has sides that are 2 3/4 inches high (if the sides are lower, you will have cheesecake batter leftover)—and wrap the bottom of the pan in a double layer of aluminum foil; put the pan on a baking sheet.
2. Stir the crumbs, sugar and salt together in a medium bowl. Pour over the melted butter and stir until all of the dry ingredients are uniformly moist. (I do this with my fingers.) Turn the ingredients into the buttered springform pan and use your fingers to pat an even layer of crumbs along the bottom of the pan and about halfway up the sides. Don't worry if the sides are not perfectly even or if the crumbs reach above or below the midway mark on the sides—this doesn't have to be a precision job. Put the pan in the freezer while you preheat the oven.
3. Center a rack in the oven, preheat the oven to 180°C and place the springform on a baking sheet. Bake for 10 minutes. Set the crust aside to cool on a rack while you make the cheesecake.
4. Reduce the oven temperature to 160°C.

To make the cheesecake:
1. Put a kettle of water on to boil.
2. Working in a stand mixer, preferably fitted with a paddle attachment, or with a hand mixer in a large bowl, beat the cream cheese at medium speed until it is soft and lives up to the creamy part of its name, about 4 minutes. With the mixer running, add the sugar and salt and continue to beat another 4 minutes or so, until the cream cheese is light. Beat in the vanilla. Add the eggs one by one, beating for a full minute after each addition—you want a well-aerated batter. Reduce the mixer speed to low and stir in the sour cream and/or heavy cream.
3. Put the foil-wrapped springform pan in the roaster pan.
4. Give the batter a few stirs with a rubber spatula, just to make sure that nothing has been left unmixed at the bottom of the bowl, and scrape the batter into the springform pan. The batter will reach the brim of the pan. (If you have a pan with lower sides and have leftover batter, you can bake the batter in a buttered ramekin or small soufflé mold.) Put the roasting pan in the oven and pour enough boiling water into the roaster to come halfway up the sides of the springform pan.
5. Bake the cheesecake for 1 hour and 30 minutes, at which point the top will be browned (and perhaps cracked) and may have risen just a little above the rim of the pan. Turn off the oven's heat and prop the oven door open with a wooden spoon. Allow the cheesecake to luxuriate in its water bath for another hour.
6. After 1 hour, carefully pull the setup out of the oven, lift the springform pan out of the roaster—be careful, there may be some hot water in the aluminum foil—remove the foil. Let the cheesecake come to room temperature on a cooling rack.
7. When the cake is cool, cover the top lightly and chill the cake for at least 4 hours, although overnight would be better.
8. At serving time, remove the sides of the springform pan - I use a hairdryer to do this - and set the cake on a serving platter.

Monday, June 6, 2011

Red Velvet Cupcakes

Don't get turned off by its shocking red. You gotta try at least one red velvet cupcake in your lifetime to understand why the Southerners love it so much.

Satisfied my curiosity over the red velvet cake frenzy. Have seen many rave how it's their favorite cake. Though a little intimidated by the in-your-face red, am always game for an American classic try-out. With a hint of chocolate, this soft babycake will get you swooning away. The fluffy tangy cream cheese frosting complements the sweet cake really well. It's a pretty apt treat to make for your Valentine.

Red Velvet Cupcakes (adapted from The Hummingbird Bakery Cookbook)
(makes 12 cupcakes, 16 for me)

Ingredients:
60g unsalted butter, at room temperature
150g caster sugar
1 egg
1 tbsp unsweetened cocoa powder
2 tbsps red food colouring (preferably Dr. Oetker's)
1/2 tsp vanilla extract
120ml buttermilk
150g plain flour
1/2 tsp bicarbonate of soda
1 1/2 tsp white vinegar

Method:
1. Preheat the oven to 170°C.
2. Put the butter and the sugar in a freestanding electric mixer with a paddle attachment (or use a handheld electric whisk) and beat on medium speed until light and fluffy and well mixed. Turn the mixer up to high speed, slowly add the egg and beat until everything is well incorporated.
3. In a separate bowl, mix together the cocoa powder, red food colouring and vanilla extract to make a thick, dark paste. Add to the butter mixture and mix thoroughly until evenly combined and coloured (scrape any unmixed ingredients from the side of the bowl with a rubber spatula). Turn the mixer down to slow speed and slowly pour in half the buttermilk. Beat until well mixed, then add half the flour, and beat until everything is well incorporated. Repeat this process until all the buttermilk and flour have been added. Scrape down the side of the bowl again. Turn the mixer up to high speed and beat until you have a smooth, even mixture. Turn the mixer down to low speed and add the salt, bicarbonate of soda and vinegar. Beat until well mixed, then turn up the speed again and beat for a couple more minutes.
4. Spoon the mixture into the paper cases until two-thirds full and bake in the preheated oven for 20–25 mins, or until the sponge bounces back when touched. A skewer inserted in the centre should come out clean. Leave the cupcakes to cool slightly in the tray before turning out onto a wire cooling rack to cool completely.
5. When cupcakes are cold, spoon cream cheese frosting on top and dust with red velvet cake crumbs.

Wednesday, June 1, 2011

Japanese Milky Madeleines

Sorry that I've not been going around leaving comments in your blogs. There's something wrong with the browser which refuses to let me log into my google account. So now I'm back in old school IE which allows me to log into my blogger, but I'm still not allowed to post with my google account. ARRRGH.

This recipe has been popular with many home bakers, you can check them out at frozenwings, j3sskitch3n and TheSweetylicious. And I totally know why now haha. It's tender and fluffy on the insides with a nice golden brown crust to boot. It's very fragrant as well. It's a really "safe" recipe which everyone will enjoy!

Japanese Milky Madeleines (adapted from Keiko Ishida's Okashi)
makes 18 cakes


Ingredients:
120g pastry flour
20g rice flour or corn flour
15g milk powder
1/2 tsp baking powder
15g honey
1 tbsp hot water
100g unsalted butter
50g double (heavy) cream (at least 45% milk fat)
140g eggs (about 3 eggs)
a pinch of salt
150g Japanese sugar( jo haku tou) or caster sugar

Method:
1.Preheat oven to 170°C. Sift together flours, milk powder and baking powder. Combine honey and hot water in a bowl.
2. Place butter, cream and vanilla in a heatproof bowl. Place over a pot of simmering water and heat, stirring until butter has melted. Set aside.
3. In another heatproof bowl, beat eggs and salt with a whisk until yolks break. dd sugar and place the bowl over a pot of simmering water and mix well. When egg mixture is warm, use an electric mixer to beat on high speed unti light and fluffy, about 5 mins. Reduce speed to medium and continue beating for abt 1 minute. Add honey and mix well.
4.Gently flod in flour mixture with a spatula. Add cream and butter mixture and fold until just incorporated.
5.Spoon batter into a piping bag and pipe into paper cups or greased madeleine pans. Bake for about 25mins until madeleines are light golden in colour . Cool on a wire rack . Store them in an airtight container at room temperature for up to 5 days.